
![]()
![]()
![]()
![]()
![]()
Features
- Input voltage: AC100-250V
- Operating frequency: 50/60Hz
- Power factor: ! 0.90
- Ambient temperature range: -20°C ~+40°C
- Color Temp: 3000K~5000K
- THD: <20%
- IP Rating: IP20
- CRI: >80Ra
- Beam angle: 170°
- Cover:Suitable to use in UL approved Clear,Stripy
- Luminous Flux:>120lm/w
- Housing material:6063-T5
- Suitable for Damp Location
- Suitable to use in UL approved enclosed fixtures
- 5 years’ warranty
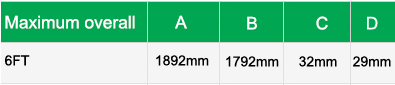
Parameter

Mounting Guides


![]() Electric Shock Attention
Electric Shock Attention
Ensure the power supply has been cut off before connecting the wire, and all wiring and installation of this product are required to be operated by professionals.
Installation Instruction


Disconnect the power before Installation
Step1. Install the mounting clip at the position where the tube is installed on and fixed by screws. Check the fixity of the mounting clip to make sure it cannot be loosed and shacked.
Step2. Fix the tube, Align the mounting clip on the back of the tube and jam the tube into the clip firmly .
Step3. Use male and female joint cables to connect multi tubes(A to B),max power slould be less than 250w.
Step4. Turn on the power.
WARNING:
1. Risk of fire or electric shock, disconnect power before installation
2. The electrical rating of these poducts are 100-277Vac, the installer must determine whether they have 100-277Vac
at the luminaries before installation
3. This product must be installed it accordance with the applicable installation code by a person familiar with the
construction and operation of the product and the hazards involved.
4. To prevent wiring damage or abrasion, do not expose wiring to edges of sheet metal or other sharp objects.


Notice For User
- Please turn off power before install or change assembly parts.
- The input voltage and lamps should be matched, after connecting the power line, Please make sure the wiring section is insulated.
- No-professionals, must not install and disassemble the lamps.